

BOXED MENAGERIE

Hi there everyone, Kassa here, happy to be sharing my recent 2nd Calico Crafts Blog Post - click on the link to feast your eyes upon the fabulous creationd by the regular dt and other guests - your in for a real treat. And tis a must to go peep at the unusual and unique stash over in the Calico Crafts Web Shop - stash to suit every crafter's tastes, Altered Art, Mixed Media and much much more yumminess........


- the 'twirly' roses are simply created from a circle of your patterned paper.....
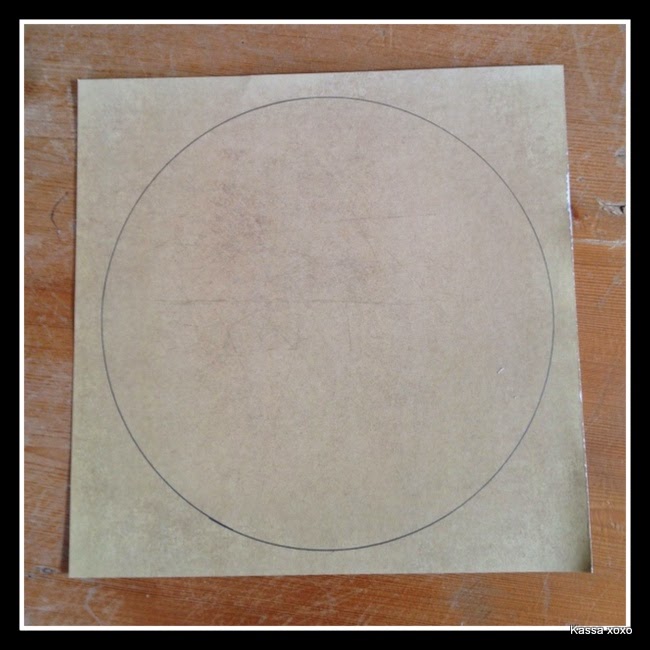
 -take a sheet of the Menagerie paper, draw round a tea plate/side plate, tear out (not cut out)


I'm offski for now - I have had a ball creating these pieces for Calico and everyone who stops by to peep.......either over on the Calico blog or over here on my blog or perhaps both blogs :-)
Firstly I would love to thank everyone for taking the time to pop by and peep at my last post 'LOVIN THE BEACH STILL', for all your fabulous comments and support you left over there on the Calico Crafts blog (click link to my actual post over there), My Blog and My Facebook Page - and like Tracy said (in her lovely message 'singing') yep I too am singing now thank you!
So.......
I wanted to create a little floral number, something a little different to my last post, what I had in my head had to be tweaked to accommodate my rather annoying Tennis Elbow - (acquired recently after a 3 week virus) - charming!)) And to add insult to injury the other hand lol believe it or not has pins & needles permanently in my pinky 'n' ring finger. So fussy cutting it was and oh how perfect was Tim Holtz's new - amazing designs - Menagerie 8-x-8 Paper Pad....
-out came the scissors and I was off.....cutting out all the delicious florals, fluffy feathers, plump eggs, that amazing nest filled with eggs, the beautiful birdies (I know not everyone is into birds so just leave them out and fill with more blooms-but I adores birds and these have soooo much fine detail in them how could anyone leave them out lol x And of course the beautiful butterflies which make up my heavily layered hanging. (layer with Calico fabric, Jute Twine, ribbon, corrugated cardboard, tiny flourish piece with rusty wire attached, fussy cut eggs, feathers, twigs, fancy edged punched out strips of the Menagerie paper in contrast and blend effect - sew random edges leaving threads dangling and not forgetting the inky edges)
The shadow box - 7 Gypsies 12-x-12 Black Shadowbox/Tray is sooo deep it cries out to be filled with layer after layer of lush stash, it comes to you in a beautiful chalky black - and cos I wanted a peeled paint look I.......
............Gesso'd (white Gesso) the shadow box - left to dry
-sanded down lightly with medium grit sandpaper......
-then randomly rubbed over the sanded gesso with a clear wax candle.....
-painted over the top of the Gesso 'n' candle wax with Matte Acrylic Paint (I mixed up a honey brown) - let dry 'n' sand and wax with the candle again......
-paint with your top coat of paint - let dry then sand - each time you sand you can see the wonderful peeled paint effect start to appear like magic.
iny blooms were created (bottom left) and the bloom garland hanging from the Rusty Wire - I simply soaked the Tando Mini Chipboard Flowers in water for a few minutes, then started to peel the petals layers slightly apart, shaped then left to dry. I layered a couple of the now dry shaped blooms together and dusted the edges with inks but for the garland I, lightly Gesso'd both sides and pasted with DecoArt Modelling Texture Paste. Once dry I sprayed with inks and pierced a tiny hole thro' their centres to fish the wire throu' - the Calico Fabric makes for lovely shabby ribbons. I attached the Garland to the wonderful Wood Flourishes, which had been given the peeled paint effect, but I popped some of the Tim Holtz Remnant Rubs - 'Elements' over the top of the dried paint, sanded to give that worn look and popped a little DecoArt modeling paste on too which I inked up and sanded when dry. The tiny and very beautiful Butterflies on Tim's 'Elements' rubs can be seen peeping from behind the open wings on my shabby Butterfly hanging - there's eggs underneath the wings on the other side - (oh I do loves a little detail lol)
The birdies sit on Darice Mini Hearts (which act as little nests and make the birdies 'pop' forwards. There are a collection of bits I find whilst out and about in there too, feathers (for movement), dried rose petals, twigs, hawthorn pieces and I've popped a little of the fabulous Natural Icelandic Moss and Jute Twine in there too - just a little of each but it has a huge impact when all popped together, a detail fest lol.
Now I said I'd leave you a little flower tute, well I've told you about the mini chipboard flowers, the huge rose bloom are layers and layers and more and more layers of the tattered florals - (the new Jumbo die and Bigz die) -
- the 'twirly' roses are simply created from a circle of your patterned paper.....
-tear (starting from the outer edge) a spiral shape, leaving enough paper in the centre to pop your glue on.

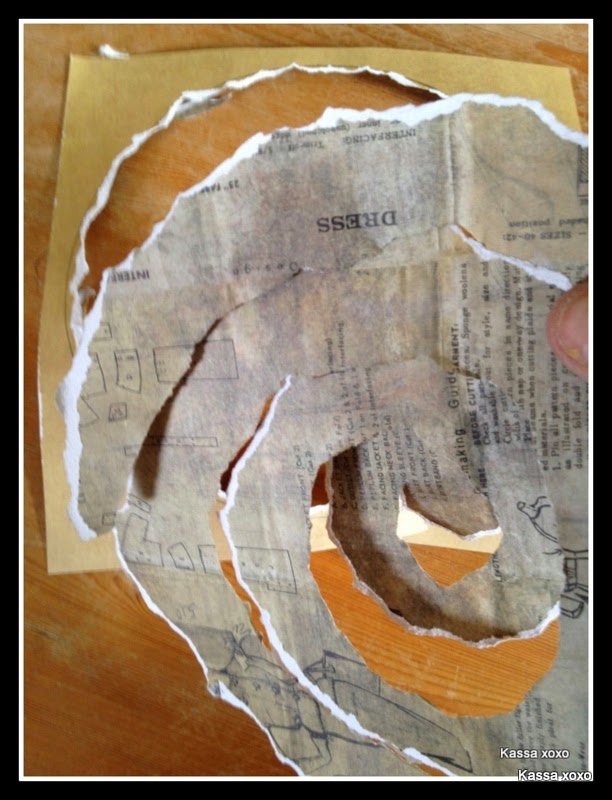
-dust the rough edges of the spiral with inks
-starting from the outer spiral, preferred pattern face-up, and turn over the outer rough edges (only tiny edges) all the way to the centre.....

 -now at this point if you like you can add extra's - pieces of thin Calico strips, Jute Twine, Lace, ribbon (anything that will add texture and detail)
-I have created the 'twirly' roses from the spirals without extra's.....


-starting from the outside spiral strip, (preferred pattern face up) form a small,tight spiral and as you work your way around the forming rose centre, start to carefully twist and turn your spiral strip as you wrap and twine it, as your rose grows your wrapping can become looser -
-once you run out of spiral strip the last turn should fold under your formed rose, pop glue on this (hot glue gun preferably - be careful of burnt fingers though!) and push down 'n' hold rose in place - the centre of the rose may still spring out , just pop a little glue in there and pop centre back in place
- these roses are sooo quick to create once you've practised and tweaked your method - you can create loose lush roses, tight crisp roses, try 12x12 papers and a dinner plate size circle, or tiny,tiny yummy sized fiddly roses...
There you have it......tis one finished shadow box full to the brim with the said wonderful stash.....the unique and unusual stash from Calico Crafts Web Shop - I have been lucky.....
-and I was thinking......maybe this is something you could create for yourself or as a FATHER'S DAY treat....I know my Dad would love it as he is a fanatical Gardner who loves to feed the birds all year long, ticking off which bird visits, when, how many times etc.....whatever you decide they (shadow boxes) are a real joy to create - immense satisfaction develops from within as your box grows layer upon layer.
I'm offski for now - I have had a ball creating these pieces for Calico and everyone who stops by to peep.......either over on the Calico blog or over here on my blog or perhaps both blogs :-)
Kassa xoxo


14 comments:
janet
Hazel
x
Well done to you Karen for your stunning creativity. You have been a very busy lady...
Big hugs to you
Tina
XXXXXX
Shirley