

'Still Lovin The Beach'

So here's my 1st of 2 projects - hope you like.......'Still Lovin The Beach'
With the weather being delightful here in Yorkshire recently its put me right in the mood for summer and holidays, and the stash in front of me took me back to hot sunny summers on the beach - the big kid in me just spilled out onto the canvas - hence my rather big canvas 'Still Lovin The Beach'
- I say big cos it's 12'' x 40''.
- and that's where I started - cover the canvas front and sides with tissue paper and the Matte Modge Podge adhesive (the tissue paper may crinkle 'n' break down which will add lovely texture)
- punch out different patterned edges along lengths of the various Graphic 45 patterned papers, apply to the edge of the canvas (left-hand side from bottom to just over halfway up - let the patterned edges hang over the edge of the canvas) Now over the top of this adhere thin strips of frayed edged natural Calico fabric (tip - tear the strips by hand) - let the patterned edged papers peep through still.


- once everything is dry use DecoArt Modeling Paste and various stencils to add more yummy texture to the front and sides of the canvas.

- once dry spray matte paints onto the canvas, let the paint dry between coats and reapply as desired (tip - wet wipes and kitchen roll come in handy to mop up paint puddles, mingle and merge the paints)
- whilst all this dries create the blooms - the big blue bloom's gorgeous papers come from the 12'' x 12'' Graphic 45 ''By The Sea' paper pad and the smaller bloom is created using the 8'' x 8'' Graphic 45 'By The Sea'' paper pad. The papers from these pads are truly delicious......choices, choices....'Eenie Meenie Miney Mo'......the combinations are endless....

- create the cones from various sized squares, distress the edges of the squares and stencil them too using the DECOART MODELING PASTE. (tip - I got the old Singer sewing machine out at this point and popped a strip of sewing here and there, leaving the cotton strands delightfully dangling to catch passing breezes, creating movement on the canvas)

- ( the largest square/cone on the big blue bloom measures 4'' x 4'' - decreasing in sizes to 3.5'' x 3.5'' and 3'' x 3'' and 2.5'' x 2.5'')
- ( the largest square/cone on the small colourful bloom measures 2.5'' x 2.5'' - decreasing by quarter inch increments to the smallest cone being 1.5'' x 1.5'')
Adhere the largest cones first to a round piece of grey-board (tea-plate size-ish) Hot glue-guns are great for this. Then start on the next tier - till you get to the centre (tip - I always build-up the blooms without glue - a dummy run)
I have shared a Tutorial on how to create these voluptuous Cone Wreaths over on a previous blog post Here - lots of piccys.

- decorating the inside of the cones, find the lovely printed 'Beach Rules' list taken from the 'Sand and Surf' paper, curl and twirl Rusty Wire (love, love, love this rusty wire) and pieces of the amazingly authentic in miniature Fishing Net.

- the stems of the blooms are the Birch Ply Wood Jagged Edge Plaque style 4 (300mm) with holes broken lengthways into 3 pieces - painted with White Gesso (let dry then paint over the Gesso with coloured Acrylic paint, let dry) when all layers are dry paint with the amazing DecoArt One Stop Crackle Medium - when the crackle medium has dried,sand off the sheen for a more vintage look - apply inks to to the crackles - make the crackles 'pop!' Adhere frayed edged Calico fabric to the backs of the stems letting the frayed edges peep through to the front edges for a soft textured feel against the jagged broken edged ply-wood.


- the finishing touch décor - (bottom of the canvas, bottom of the big blue bloom stem, peeping from under the cones of the small bloom) - Driftwood Sticks, Fishing Net, Various Shells and all my various curiosities are adhered to the canvas with DecoArt modelling Paste - once dried apply paints in and around/over the décor so it appears seamless and be at one with the canvas, a perfect harmonious blend. Place the net over the top of the décor loveliness (tip - I apply a thin coat of Gesso to the net - scrunching in my hands - let the net dry ever-so slightly before placing and adhering over the top of the décor loveliness)


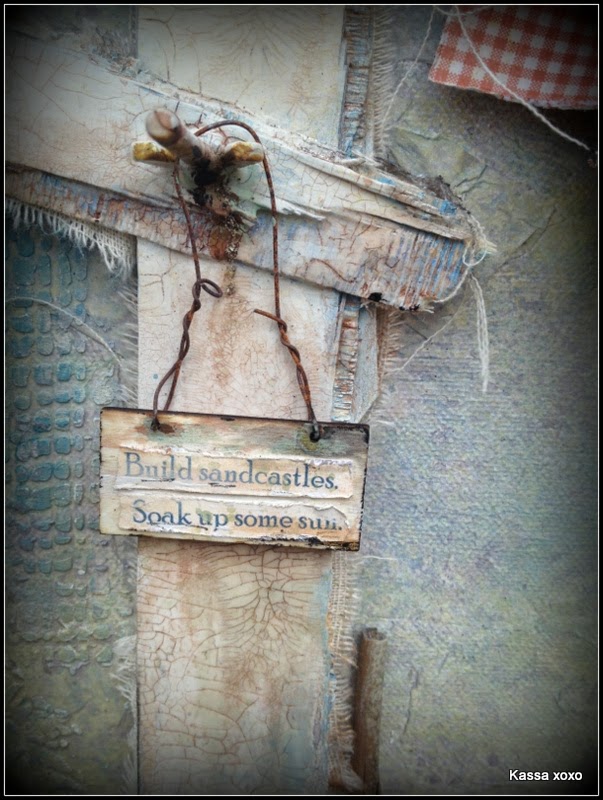
- again the lovely printed 'Beach Rules' list taken from the 'Sand and Surf' paper and the words 'To the Beach' taken from the 12'' x 12'' 'My Anchor' paper come into play in various places on the canvas - the little dangling Birch Ply Wood Rectangle Plaque Style 6 (50mm) with holes is a perfect fit for these typed nautical words and looks kinda cool just hanging from the Rusty Wire on the over large (made to look rusty with paints) nuts/bolts/wing-nuts.
Once everything is in place stand back and add little extras like, 4 Ply Jute Twine, Natural Icelandic Moss, extras of the Calico Fabric, Lace, pins, Washi tape and more paints to highlight and shadow. Oh and a drip or 2 of paint - a must!

So I'm offski for now but will be back in soon with another creation (vintage, floral shabby chic-ness....sorry a little teaser! - oh and a little flower tute too!)
I've really enjoyed creating this 'Still Lovin The Beach' canvas, guesting over here at the Calico Blog (click here to pop over n peep at my actual post Over on the Calico Blog) It was a fabulous and lovely little adventure, thank you......
.....and thank you for stopping by today.....
Kassa xoxo


Lovely!! Fab blooms, and loving the seaside theme so right for this time of the year - mind after the last couple of days we could be washed away!!!! Axxx
ReplyDeleteAbsolutely blown away...it's beautiful and so detailed. I love it xxx
ReplyDeleteStunning. Such a vision!
ReplyDeleteWay awesomely cool!
ReplyDeleteThr quality of your photos are fab xx Beautiful work, and you give me so many ideas!
ReplyDelete