Afternoon
Back in again x
....back with the brand new amazing tunnel cards adorned in the lush textured new Authentique papers
 |
| I used 3 of the new Authentique papers for this card |
 |
| The paper ribbon on the edges of the card is easy to create - trim your desired width of paper, scrunch and bend it a little so you have a raggedy look then simply pleat your paper (re-pleat till you are happy) adhere with strong tape |
 |
The paper bow is carefully twiddled into place - easy (just be patient and gentle)
The Candi is newsprint - very lightly sanded (optional) and coloured with Tim Holtz Pumice Stone Distress Ink Pad x
This newsprint Candi can be inked to any colour to match any creation - a must have in my craft stash x |
 |
Multi- layered bloom filled with the inked newsprint Candi and finished off with a cute little winter white twine
I think a little charm dangling from the twine would look darling - perhaps a heart X |
Now.....
 |
| All the words/quotes you see on the card are taken from the bottom strip of the papers - I just trim them to size by eye and adhere x |
 |
| I lovingly cut round all the gorgeous blooms from 2 sheets of this beautiful Authentique 12 x 12 paper (took most of a day lol - but so worth it to create all this depth) |
More.....
 |
The cute kraft Candi (top centre) sits sooo well with these new yummy Authentique textured papers x
I love creating tone on tone cards x |
 |
If your lovin the multi-layered Birdie Bert, Birdie Betty and their little cutesy birdhouse they'll be out soon in different colour-ways (another little design coming your way - I have been busy!!)
The glasses and tash were a little mission I had dreamt up and they did take a little patience when cutting out my drawings lol - but worth all the hardship as they bring a joviality to the scene X
Ooooops......a little CHA tunnel card inspiration x
|
 |
A little more inspiration - this is the 'Scalloped Circle' tunnel card.
See the possibilities are endless - the wreath flowers/blooms fit snugly around the aperture perfectly!!! |
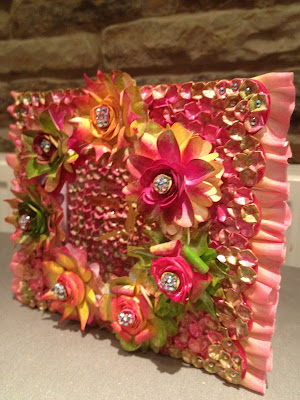 |
| To achieve the almost neon crazy colours - distress inks and mists were applied to the blooms and the Candi till I was happi with the end result (I actually did a dance around my craft-room cos I was soooo pleased with the end result!) |
 |
| Tiny crystals were added to each crushed Candi in the background for extra-special sparkle, on the front I added crystals to only the corner crushed Candi's and firefly, tropical-tangerine, glam-pink and stardust Stickles to all the other crushed Candi giving the card an extra 'zing'. The whole card was spritzed 'n' glitzed. |
 |
| And I added 'HAPPI' words that I find from magazines etc. Cut to size by eye and adhere to acetate before attaching to the inner of the tunnel card x |
WoWzers.....more CHA
 |
| The heart Tunnel card - up on the web sooooon!!! - soooo divine x |
 |
| You can see the ribbon that holds the sentiment in the middle of the heart aperture popping out from the sides of the tunnel card...... |
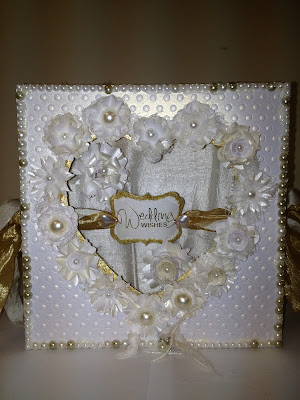 |
| I created a false front for my card using starlights-silver-ice card, embossed it and covered all the outside edges with tiny pearls - |
 |
| The yummy mini blooms have netting, lace and cheesecloth adhered between the yayers - looks darling and plumps up your blooms x (a neat little trick/tip - love sharing them x) |
......and breathe lol
....hope you've enjoyed today's surprise post!!! I have REALLY loved creating all these tunnel cards with all the yummy stash, they are a dream to work with - soooo many possibilities with amazing results.
I loVe Tunnel cards......I'm truly hooked and addicted 100%
I'd love to know which is your fav tunnel card??? - so far each card is loved just as much by different peeps - so it would be interesting to see if you all have a clear fav????
(((huggles)))
Kxoxo


Well you have been a busy girl!
ReplyDeleteExcellent work karen love your colour ways xx